Slow motion has many uses in videos, from creating stunning slideshow backgrounds to adding to a narrative’s emotional context. Whatever your reason for making a slow motion sequence, you can’t go wrong with this effect. In this After Effects slow motion tutorial, Motion Array will look at ways to create cool slow-mo that grabs your viewers’ attention, including how to add the iconic Vertigo effect to drone footage.
Summary
Part 1: Learn basic smooth slow motion in After Effects
There are 3 ways to create slow motion effects in After Effects: Time Stretch, Timewarp, and Time Remapping. In this tutorial, we’ll look at the first 2, but if you want to find out about Time Remapping, you can check out the linked handy guide.
The first step is to trim your footage to the correct length before you apply your speed effects. Once the speed effects have been added, you should also make sure your composition is long enough for your clip. Once you’re happy with the clip you want to slow down, choose either the Time Stretch or Timewarp methods below.
While After Effects slow motion is pretty realistic, you’ll always get the best slow motion shots by filming specifically for slow motion. You should film the footage at a higher-than-standard frame rate.
Remember, the frame rate tells you how many images are recorded per second. What we understand as ‘regular speed’ footage is filmed at 24 fps. Anything below that looks a little jerky and wrong to the eye. If you shoot at 50 fps, you can slow the footage to half speed and stay above 24 fps, giving you all those extra frames to play with in the slow-mo effect. This is the data that’s missing when you create slow motion in post.
What if you didn’t film for slow motion in-camera? If it’s at 24 or 30 fps, you can still slow down the footage with programs like After Effects, and it will look (almost) as good. Let’s see how to do it.
Option 1: Time Stretch
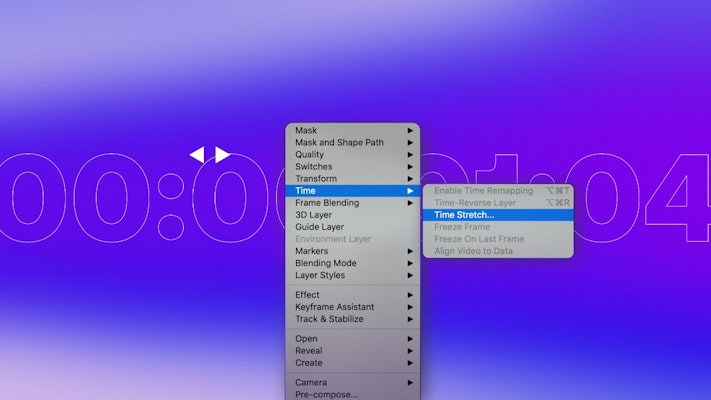
The Time Stretch tool allows you to stretch a clip in your timeline, increasing its length. Trimming the clip tells After Effects which portion you want to use.
- Right-click on the clip in the timeline and select Time > Time Stretch.
- In the dialogue box, you can stretch your clip using 2 different methods: the Stretch Factor and New Duration.
- Change the Stretch Factor setting to adjust your clip in percentage terms. The normal speed would be 100, and to slow your clip to half speed, you would change to 200.
- Adjust the Duration setting if you know how long you need the video to be, but aren’t worried about how much the speed has changed. For example, use 04.00 to adjust the duration to 4 seconds. This method is helpful if you need to fit footage into a specific After Effects template.
- Click on the Layers panel on the Frame Blend option to choose either Standard Frame Blending or Pixel Motion Frame Blending.
Option 2: Timewarp
Timewarp is an effect that lets you slow down and speed up a clip without changing its duration, making it useful for After Effects slow motion. Trimming the clip tells the program how long you want it to be in the timeline, and the Timewarp effect compresses or extends the footage beyond your trim points.
- Right-click on your clip and choose Effect > Time > Timewarp.
- Ensure the Method is set to Pixel Motion in the Effects Control panel.
- Change the Speed setting to 25 to create a half-speed effect. The full-speed setting will be 50, so it can be tricky to work out exactly what settings you need for a specific duration. Don’t be afraid to play around a little!
While this After Effects slow motion tutorial has given you the basic skills to create the effect, a shortcut is always nice. Twixtor is a plugin that can replace the built-in Timewarp effect, and it’s well worth checking out.
Part 2: How to use the Twixtor plugin
Twixtor by RE:Vision Effects is a plugin for After Effects that will help you create amazing slow motion footage even if you haven’t shot at a higher frame rate. Once you’ve installed the plugin, follow these simple steps to create a slow motion effect.
- Add the clip you’re working with to the timeline and trim it to the desired length. Make sure your timeline is long enough to include the additional clip length.
- Go to Effect > Vision Plugins > Twixtor to add the effect to your clip.
- In the Effects Control panel, set your Input Frame Rate to the original frame rate of your video.
- Change the Speed setting to your desired percent.
- Finally, drag the end of your clip to the new length in the timeline.
Part 3: Create a drone footage cinematic effect using slow motion in After Effects
If you’re fortunate enough to use a drone for your After Effects slow motion project, there are some things to consider when filming to help create that cinematic look.
Step 1: Shoot at a higher frame rate
The higher the frames per second your camera films, the slower you can make your footage before the quality degrades. Always make sure your footage is shot at 50 fps as a minimum. This will enable you to slow down your footage and double the clip’s playing time without losing quality.
Step 2: Interpret your footage
Rather than using time effects on your drone footage, you can Interpret your footage at whatever frame rate you prefer, allowing you to drag it from the browser to the timeline at your chosen speed.
- Import your clip by hitting Ctrl+I (Cmd+I for Mac) on your keyboard.
- Find the clip in the Project Browser and right-click.
- Choose Interpret Footage > Main.
- Select the Conform To Frame Rate option, change the setting to 24 fps, and hit OK.
- Drag your clip to your timeline and you’ll see that your 60 fps footage has been stretched out to 24 fps. You can edit your clip like any other media asset, adding effects, adjustment layers, and keyframe animations.
Step 3: Add pixel motion blur
If you’re struggling to make smooth slow motion in After Effects and the Frame Blend options aren’t working, you can add the Pixel Motion Blur effect.
- Complete the steps above to interpret your footage. You can also apply this effect to slow motion footage created with Time Stretch, Timewarp, and Time Remapping.
- Right-click on your clip in the timeline and go to Effects > Time > Pixel Motion Blur.
- Make sure Shutter Control is set to Manual.
- Adjust the Shutter Angle and Shutter Sample settings to change the depth of the pixel blur added to your clip.
Step 4: Create the Vertigo effect
You can create the cool Vertigo effect with moving drone footage, where 2 camera movements appear to be happening simultaneously. It’s called the Vertigo effect because famed filmmaker Alfred Hitchcock invented it for his film Vertigo. You can learn more about the Vertigo effect if you’re curious about this famous part of cinema history.
The Vertigo effect is normally produced in-camera using a zoom lens and camera dolly. This is why it’s sometimes called the dolly zoom. After Effects will help you achieve the same effect on your drone footage.
- Place the playhead at the end of your clip and create a Scale keyframe.
- Move the playhead to the start of your clip and create a second Scale keyframe.
- Adjust the Scale of your clip. You should try to create a motion opposite to your camera movements. If your camera is moving toward something, increase the scale of your footage at the start. If the camera moves away from something, increase the scale at the end.
- Play around with the Scale to see how much you want to add until you get that spinning vertigo feeling.
After Effects slow motion tools are comprehensive and robust when used correctly. You can create a massive range of styles and looks utilizing the Time Stretch and Timewarp tools. If you’re a slow motion fan, learn how easy it is to create slow motion in Premiere Pro, DaVinci Resolve, and Final Cut Pro, too.