After Effects isn’t the program, you’d usually choose for editing audio, as the program is better suited to animation work. However, AE does have some neat audio effects you can use alongside your visual effects; let’s check them out.
Summary
Part 1: Learn the 10 Essential After Effects Audio Effects
After Effects has 10 drag and drop audio effects, found in the Effects panel. While you can find all these effects in Premiere, it can sometimes be easier to create the audio alongside the visuals when using After Effects.
1. Backwards Effect
The backward effect is a lot of fun – this simple drag and drop effect will play your audio backward. Unlike playing around with the time reverse effect, which will adjust the whole clip (visual and audio), the backwards audio effect will only change the audio, not the video.
2. Bass & Treble Effect
As you might expect, the bass & treble effect basically allows you to adjust the bass and treble in your audio. This simple effect will enable you to boost and reduce your audio’s highest and lowest frequencies.
3. Delay Effect
This brilliant effect allows you to create an audio delay that echoes repeats over your remaining audio. Once added, the effect will allow you to adjust the delay time and delay amount, along with the feedback and dry/wet out.
4. Flange & Chorus Effect
Flanging and chorus are 2 modulation effects that create repetitions in your audio at varying frequencies and delay amounts. The flange offers a super short (usually around 20 milliseconds) reverb, while the chorus allows for a longer delay in the effect.
5. High-Low Pass Effect
The high-low pass effects allow you to block audio frequencies above or below a particular point. The effect adds a cutoff frequency slider and dry out and wet out settings.
6. Modulator Effect
The modulator effect is similar to the delay effect only; rather than repeating at a particular interval, you can extend the delay each time. The time-delayed version of your audio can increase in delay size over time.
7. Parametric EQ Effect
The parametric equalizer gives you control over the level, exact frequency, and bandwidth/range. Parametric EQ is a precision effect that finely tunes the overall sound levels.
8. Reverb Effect
Reverb is the repeating vibration of a sound signal of the surrounding surfaces. Reverb can be created digitally with the reverb effect or physically with instruments such as the tremolo/whammy bar on a guitar.
9. Stereo Mixer Effect
The stereo mixer effect adds the panning controls you’d see in Premiere or Final Cut. The panning left and right gives you complete control over the stereo direction of the audio you’re hearing.
10. Tone Effect
The tone effect is a strange little SFX that creates a single tone, with up to 5 frequencies in one effect. The tone effect can be used to develop consistent sound, such as the hum of an air conditioning unit. Unlike other audio effects, the tone effect doesn’t need to be added to a sound layer; it also works on adjustment and solid Layers.
Part 2: How to Edit & Use Audio Effects in After Effects
Most audio effects work best when combined with others to create a unique or new sound. Let’s look at how you can use 2 effects and a few cuts to create a cool glitchy music style.
Step 1: Add a Glitch Effect
To create an effective glitch effect, you need to add a few cuts and remove a few frames – basically the same as adding a glitch to your video.
- Find the point in your track where you want to glitch to occur.
- Zoom in to the track; drop down the Audio and Audio Waveform in the Layers panel to see what the sound looks like.
- Place your playhead over the first cut point and hit Cmd+Shift+D or Ctrl+Shift+D to split the layer.
- Keep moving forward a frame at a time, splitting the audio into separate tracks.
- When you have reached where you want the glitch to end, go back through and delete every other frame.
- Highlight all audio layers and hit Cmd+Shift+C or Ctrl+Shift+C.
- Name your new compound clip and hit OK.
Step 2: Add the High-Low Pass Effect
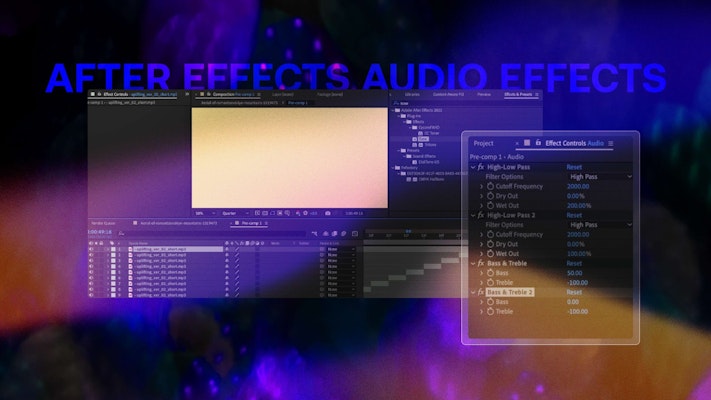
The High-Low Pass effect will help us limit the frequencies in our audio track, which will sound fantastic and help us for steps 3 and 4.
- Search for High-Low Pass in the Effects panel and add it to your audio comp.
- Select the layer you need in the timeline, then go to the Effects Control panel.
- Set the Filter options to High Pass.
- Set the Cutoff Frequency to 2000, the Dry Out to 0, and the Wet Out to 200.
- Click on the High-Low Pass effect in the Effects Control panel and hit Cmd+D or Ctrl+D.
- In the duplicate of the effect, adjust the Cut Off Frequency to Low Pass and the Wet Out to 100.
Step 3: Add Bass & Treble
The final step is to add some Bass & Treble to your track; as with the High-Low Pass effect, you’ll need 2.
- In the Effects Control panel, search for Bass & Treble, and add it to your audio clip.
- Select the effect and hit Cmd+D or Ctrl+D to create a copy in the Effects Control panel.
- For the first of the Bass & Treble effect, set the Bass to 50 and the Treble to -100.
- For the second effect, set the Bass to 0 and the Treble to -100.
Take a little time to play with the settings to see how it affects your track and what works for your project.
Audio editing isn’t something we’d suggest you do in After Effects as a standard. Premiere Pro, Davinci Resolve, and Final Cut Pro all have more in-depth audio editing solutions before you get to audio-specific software. However, the handful of audio effects that AE offers can help you quickly produce sounds to match the looks you want to create.


