


Slow motion is that awesome effect you see in movies, where time seems to stand still, and you can see every detail of the action. Want to harness that same power for your own projects? Today, Motion Array will show you how to create slow motion in DaVinci Resolve.
Summary
What is true slow motion and speed ramping?
Before we get started, let’s recap what true slow motion is. The super-smooth slow motion in movies is filmed at high frame rates, from 60 to 240 frames per second (fps) and above. This footage is then played at a lower frame rate, like 24 fps, to slow it down in real time. There’s more to know about shooting slow-motion footage if you’re curious.
One second of 240 fps footage takes 10 seconds to play at 24 fps, giving you very smooth slow motion. For reference, we typically watch footage at either 24 fps or 30 fps. Changing the speed at which the footage plays over time is called speed ramping.
Here, you’ll learn how to create a slow-motion effect in post — i.e., after the footage is shot. This creates a believable slow-motion look, but will be less natural than footage filmed specifically for slow motion. If you can, try using a slow-motion camera when you film to get the effect. If not, these handy DaVinci Resolve slow-motion techniques will soon make your footage look amazing. Let’s get to it. You can also explore other DaVinci resolve effects in this helpful tutorial.
Part 1: The main methods to create slow motion in DaVinci Resolve
To slow down any footage, you need to play it back at a lower frame rate than when it was filmed. You can’t slow it down without creating new frames if it wasn’t filmed at a higher frame rate. These will fill in the gaps to create the effect. While it’s possible to do this, as you’ll see later, the best results will always be achieved using high frame rate footage and then slowing it down.
Let’s begin by creating a slow-motion effect. For this to work well, the footage must be filmed at a frame rate of at least 2x the frame rate of your timeline. For example, with a 24 fps timeline, the footage should’ve been filmed at at least 48 fps. Common frame rates for slow motion are 60, 120, and 240 fps. The higher the frame rate, the more you can slow it down.
Changing clip speed
The quickest way to slow down your footage is to change the clip speed. There are a few main ways to slow down footage in DaVinci Resolve. You can add some of your own high frame rate footage to the timeline in the Edit page to try this out, or use stock footage from Motion Array.
Select the clip and check the frame rate in the Metadata tab, then check your Timeline frame rate in the Settings tab. Use these two figures to work out how much you can slow it down without losing frames, then use one of the methods below to achieve a realistic slow-motion effect.
- Press R to bring up the Change Speed dialogue. You can also access Change Clip Speed by right-clicking on the clip or from the clip menu at the top of the interface.
- Change the speed — e.g., to 50% to slow it down to half speed. Check the Ripple Timeline box and click Change. The clip will now play in 50% slow motion and has doubled in length. A speedometer icon will appear on the clip, letting you know you’ve changed the clip’s speed. If you don’t check the Ripple Sequence box, the clip will play in slow motion for the duration of the original clip.
- Press Ctrl+R (or Cmd+R for Mac) to bring up the Retime controls. You’ll see a dropdown menu with a percentage. Change this percentage to slow down the clip, or select the clip edge and wait until you see double arrows appear.
- Now drag the edge of the clip to speed it up or slow it down. You’ll learn more about this method in Part 2.
- In the Media Pool, you can right-click the clip, select Clip Attributes, and then change the speed to match the timeline frame rate. This changes the clip’s playback frame rate. So, when you drop it onto the timeline, the clip will play in slow motion to match the timeline frame rate. This is useful when you have a lot of B-roll that you want to play in slow motion without needing to retime. It really speeds up your editing.
Frame interpolation methods
What if you don’t have enough frames to slow down your clip? You can still create DaVinci Resolve slow motion. The program will need to use the frames it has to make up the missing frames, which is called frame interpolation. For example, if you were to try and slow down a 1 second-long 24 fps clip in a 24 fps timeline by 50%, DaVinci Resolve needs to create 24 new frames to fill in the gaps. If you’d like to know more about frame rates in DaVinci Resolve, Motion Array’s tutorial may help.
Likewise, if you drop a 24 fps clip in a 30 fps timeline, DaVinci Resolve needs to create 6 more frames for every second of the clip. The frame interpolation method greatly impacts the quality of the results. Here’s an overview of DaVinci Resolve’s 4 frame interpolation methods:
- Nearest: This method copies the nearest frames to the ones being slowed. In the 24 fps example above, the program would effectively double each frame by showing it twice. It’s the least computer-intensive method, but the result will look choppy.
- Frame Blend: This method blends the frames on either side to create new frames in between. It’s more intensive on your computer, but will deliver a better result and works reasonably well for timelapse footage.
- Optical Flow: A step up from Frame Blend, this method is very intensive on your computer. However, it will deliver better results in most cases.
- Speed Warp: Take Optical Flow even further by using the DaVinci Resolve Neural Engine and machine learning to create new frames. It delivers great results, but is only available in the Studio (paid) version of DaVinci Resolve and is very resource-intensive.
To set DaVinci Resolve’s slow-motion frame interpolation method, you’ll use Master Settings > Frame Interpolation You can do it at the clip level in the Inspector under Retiming and Scaling.
You can set the Motion Estimation mode and Motion range for performance or quality (Faster vs Enhanced and Large to Small) along with the frame interpolation options.
Audio and slow motion
Changing the speed at which a clip plays back also affects the audio linked to that clip. This doesn’t apply to changes made in Clip Attributes in the Media Pool or unlinked audio. To change separately recorded audio along with the clip, you need to link the clip and the audio.
Generally, audio for slow-motion clips should be dealt with separately (by unlinking it from the clip) unless you want the sound to change along with the clip. This may work when it’s intentional — e.g., a slow-motion reaction shot. To achieve slow-motion sound, untick Pitch Correction in the Change Clip Speed dialog box.
Part 2: Learn speed ramping in DaVinci Resolve
Speed ramping refers to changing the clip speed over time by adding speed points to it. The speed points allow you to break the clip into sections that play at different speeds. It’s a great way to make your DaVinci Resolve slow motion smooth, realistic, and impactful.
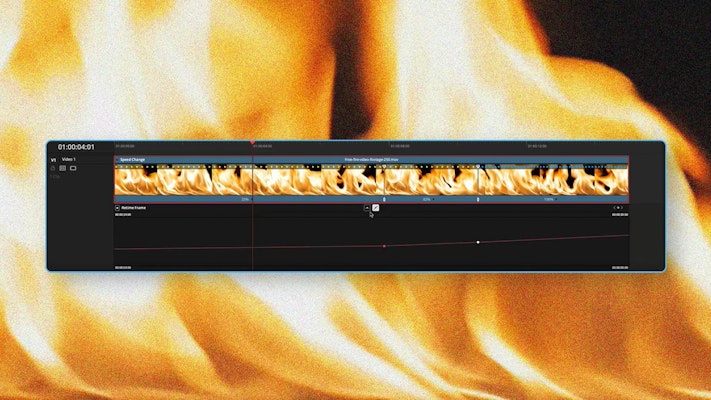
Retime controls
- To access the retime controls, press Ctrl+R (or Cmd+R for Mac). You can also right-click the clip to bring up the Retime Controls or access them from the clip menu.
- To add a default speed ramp, click on the Speed dropdown and choose one of the ramp options.
- The clip will be broken into 5 speed points, up from 0% or down to 0%. You can change the speed of each section as needed.
- To add speed points manually, move the playhead to where you want to add them, select the speed dropdown, and click Add Speed Point. Add as many as you need and change each section to the speed you want it to play. The yellow arrows on the clip indicate sections where the clip has been slowed down.
Note: To hide the Retime Controls once you’ve made your changes, click the X beside Speed Change, or Ctrl+R (or Cmd+R for Mac). You can explore DaVinci Resolve’s shortcuts if you want to work faster.
You also have a variety of speed change options, as well as freeze frames and reverse speed. Freeze frames are red bars, rewind is reversed arrows, and if you speed up a clip above 100%, you get closely spaced blue arrows.
Retime curves
When adding speed points, the changes between them are abrupt. The retime curve in DaVinci Resolve smooths out the transition between speed points.
- Right-click on the clip and select Retime Curves. Then select Retime Speed from the small dropdown on the top left. It defaults to Retime Frame.
- You’ll see there are hard changes between the speed points.
- To fix this, click on a speed point and select the Bézier Handles icon. You can now drag the handles to smooth the speed change.
- You can also click on the keyframe icon to add a new speed point. Drag it up or down to change the speed of that section.
Part 3: Troubleshooting slow-motion edits
You might encounter a few issues when working with the DaVinci Resolve slow-motion feature. Most of these problems are caused by not understanding how DaVinci Resolve works with slow motion, so, after reading this tutorial, you should be able to avoid most of them. Here are some troubleshooting tips if you’re still struggling with DaVinci Resolve slow motion.
Choppy or odd slow motion
In most cases, choppy footage was slowed down beyond the available frames. DaVinci Resolve is making up new frames to compensate, and it’s not doing so realistically. There’s no warning for this. You need to know the frame rates of your footage and how much you can push it. So, check the frame rate and adjust your clip speed accordingly.
Alternatively, if you don’t have enough frames and still need to slow it down, play with the frame interpolation settings for the clip until you find a usable result. We advise caution, however, as these methods are resource-intensive and can stress even the most capable systems. You’ll most likely need time to let it render for smooth playback.
Playback issues or your computer locking up
The frame interpolation method set for the clip or project can cause even robust systems to struggle if you slow down footage excessively — especially if you have options like Optical Flow or Speed Warp selected! Give the program time to render or change the frame interpolation to a less stressful one.
Sometimes, generating optimized media, using timeline proxy mode, or rendering the clips in place can help you achieve smooth playback and make it easier on your computer.
Understanding the importance of frame rates and how DaVinci Resolve slow motion works is essential. Once you understand the core idea, creating impressive slow motion with DaVinci Resolve is very simple and effective. Have fun using it in your next project!


