Is your handheld footage feeling a bit shaky? Do you want to calm things down and smooth out an entire sequence? The good news is that stabilizing footage in DaVinci Resolve is super easy, and there are several ways to do it. Let’s explore the different ways you can stabilize your video clips.
Summary
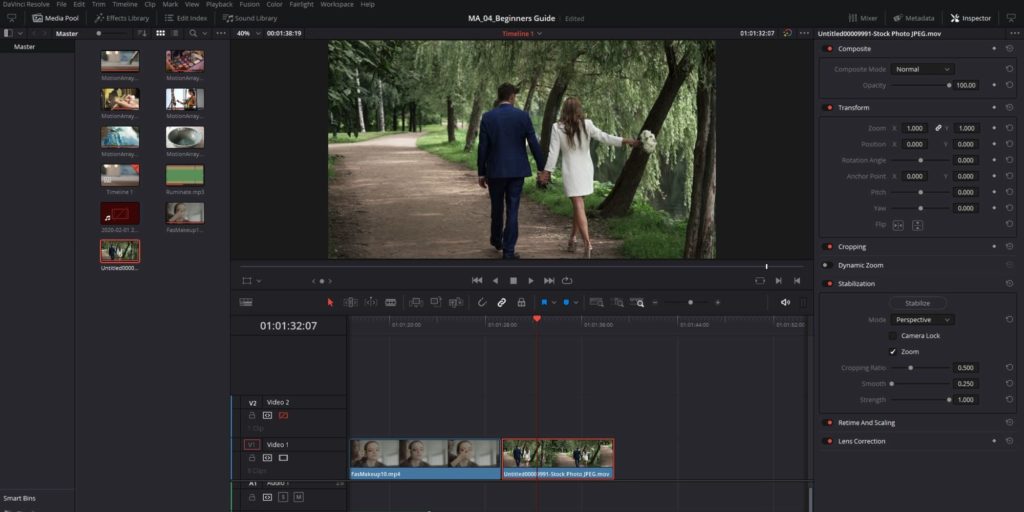
How to stabilize videos in the Edit tab
- Select the clip you want to stabilize in the Edit tab.
- Click the “Inspector” icon.
- Scroll down to the “Stabilization” section.
- There are 3 stabilization modes in DaVinci Resolve that use different algorithms to stabilize your footage. Click the drop-down menu beside “Mode” to view them:
- Perspective (similar to the Warp Stabilizer in Adobe Premiere Pro)
- Similarity (applies pan, tilt, zoom, and rotation analysis)
- Translation (applies pan and tilt analysis only; useful for stabilizing footage along the x and y axes)

The other settings also provide additional functionality:
- Camera Lock is a tripod stabilization mode. It will try to eliminate all of the movement in the footage. Check the “Camera Lock” option to remove all of the other options.
- The Zoom function will push into the image to try and remove all the black bars on the edge that may appear when the footage is stabilized.
- Cropping Ratio tells DaVinci how much it can crop the image to stabilize it. The higher the number, the more the image can be cropped.
- The Smooth slider determines how smoothly the camera moves if you don’t remove all of the movements from a handheld shot. The default is 0.250, but it can be adjusted.
- Finally, Strength lets DaVinci know how strong you want your stabilization to be. By default, it’s set to the maximum.
- You’ll need to use some trial and error to stabilize the clip you selected. Begin with Perspective mode with the default settings selected.
- Click “Stabilize” and a progress bar will appear.
- If you make any changes to the settings, you’ll need to hit “Stabilize” again.
Now, take a look at the result. How does the footage look? You might find that it’s zoomed in quite a bit, or some artifacts appear in the image. That’s probably not what you’re looking for, so try selecting a different mode.
- Under “Mode”, select “Translation”.
- Drag the “Smooth” slider to the right to increase it.
- Click “Stabilize”.
Continue this trial and error process, trying out the different stabilization modes until you’re happy with the result.
How to stabilize videos in the Color tab
Alternatively, you have the option to stabilize clips while working in the Color tab.
- Go to the middle section and select the Tracker tool (the icon that looks like a target). Then go to “Window” > “Stabilizer”.
- At the bottom, you’ll see the same options as in the above Edit tab (Cropping Ratio, Smooth, Strength, Camera, and Zoom).
- This time, go to the drop-down menu and select “Similarity”.
- Click the “Stabilize” button. A pop-up window will show progress.
How to stabilize videos in the Cut tab
Another way to stabilize video is in the Cut tab, but you have less control here. It’s a good option if your stabilization needs are simple, or if you’re short on time.
- From the Cut page, select the clip to be stabilized.
- Click the icon with three sliders to display “Tools”. Select the stabilize icon.
- Select a stabilization mode and click the “Stabilize” button.
Wrapping Up
This is the beauty of having different stabilization modes — if one doesn’t work, you can always try another to achieve the desired effect.
Remember, the trick to stabilizing footage in DaVinci Resolve is to use trial and error to achieve the best result. The advantage of using different modes is your ability to blend and change settings until you have the effect you’re looking for.
If you’re just getting started, experiment with the above methods and you’ll have your footage stabilized in no time. Check out our other tutorials to learn additional editing techniques, such as removing color or black backgrounds in DaVinci Resolve or fixing and adjusting frame rates.