Well-used camera movements, like dramatic zooms, create visual interest in a video clip. They’re also vital in guiding the viewer’s eye. While working on an edit, you may find a clip that could benefit from a zoom but it didn’t happen on camera. This is a common problem with stock footage.
Don’t worry! You can zoom in Adobe Premiere Pro instead. No one — save for fellow pros — will know you didn’t shoot it from the camera. Let’s get started.

Summary
Part 1: How to zoom in on a clip
We’re going to let you in on a secret. Digital zoom in Premiere Pro is a simple animation effect. The clip is scaled up automatically. Want to see this in action? Follow the quick tutorial below.
For this example, you’ll learn how to zoom in Premiere Pro using stock video of a coffee cup, so that you can try it yourself.
Note: Zooming in will result in some loss of quality in your footage. For the best results, use high-resolution video for this effect.
Step 1: Set the zoom starting point in Premiere Pro
- Select a clip in your timeline. Position the playhead wherever you want the zoom to start.
- Open Effect Controls and find Scale and Position.
- Click the animation option (the little stopwatch) to turn on keyframing. The stopwatch icon is blue when keyframing is on.
- Now, create a keyframe for Position and Scale.
- Any further adjustments will be keyframed separately.
Step 2: Animate the zoom effect
- Move the playhead to where the zoom should end.
- Now, adjust Scale and Position so you’re zoomed in and have framed your subject.
- As long as keyframing is on, new keyframes will be recorded.
- Play it back and make any necessary adjustments.
- To make the movement quicker, move the keyframes closer. For a slower zoom in Premiere Pro, move them further apart.
Step 3: Polish and complete your zoom
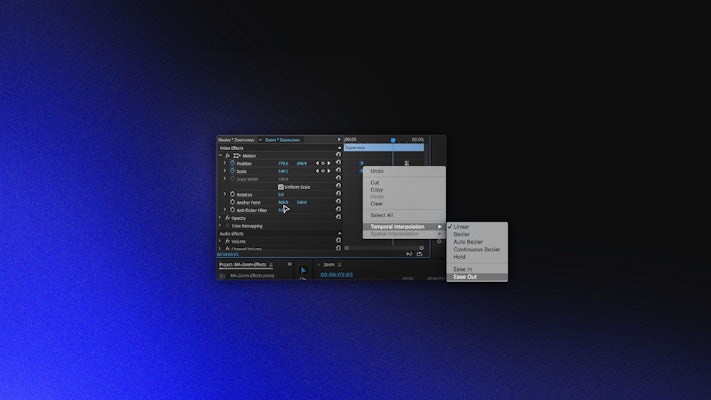
- Does the move start and stop abruptly? To create a smoother zoom-in on a video in Premiere Pro, select your first keyframes and right-click for more options.
- Try to Ease Out at the beginning of the movement and Ease In at the end. This mimics a natural zoom.
- To create a zoom-out, set your first keyframes at the beginning of the clip. Then, adjust the Scale and Position properties so the clip is zoomed in at the start.
Part 2: 3 cool Premiere Pro zoom effects to try
Now you know the basics. However, digital zooms in Adobe Premiere Pro can do more than simply zoom in and out. Level up with fun transition effects or create gripping drama with a digital dolly zoom. It’s easy to make more creative videos — you’re only limited by your imagination.
1. Shutter zoom transition effect
A shutter zoom effect emulates a camera shutter. It’ll seem like the camera is taking still photos, zooming in on the subject in each shot. Shutter zoom is often used as a transition effect in journalistic, investigative and true crime content. It can also be used for great horror moments. Click. Click. Click. It’s going to get you.
We’ll use Motion Array’s clip of a roadside woman to create this effect in the example below.
Step 1: Duplicate the clip on the timeline
- Duplicate your clip as often as you want the effect to zoom in. Typically, around 3 or 4 cuts will do the trick.
- Duplicate the clip by Option + dragging (Alt on a PC) the clip straight up in the timeline.
Step 2: Scale it up
- Use the Scale property in the Effect Controls panel to scale up each clip slightly more than the last.
- You can hide tracks with the eyeball icon while you work.
Step 3: Apply a transform effect
- In the Effects panel, find the Transform effect and drag it to the first clip.
- Then, uncheck use composition shutter angle in the Effect Controls panel and set it to 180.
- This will create motion blur when you animate.
Fun Tip: You can also use the Transform effect instead of the Motion adjustment to create motion blur in a standard zoom. 1 skill with 2 fun ways to use it unlocked.
Step 4: Animate your zoom effect
- Using the Position property under the Transform effect (not Motion), toggle animation (the stopwatch) to set your first keyframe.
- Move the playhead forward 4 or so frames and adjust the Position property so the clip is up and out of the frame.
- Trim the excess footage from the end of the clip.
Step 5: Repeat your shutter zoom in Premiere Pro
Pro Tip: Keyframes for the selected clip will always display in the Effect Controls panel. To view them in the Timeline as well, use the Timeline handles to view tracks larger. Right-click the fx icon and select the keyframed property you want to view.
- Copy and paste the Transform effect into the next track.
- Select the 2 keyframes — in either the Effect Controls panel or the timeline — and drag them into position right after the first animation. Repeat with the remaining tracks.
- The Timeline will look something like this:
Step 6: Review and add finishing touches
- Watch it back in real time and make any adjustments.
- Add in camera shutter sound effects, and you’ll be as good as the Hollywood pros.
2. Smooth zoom transition effect
The Smooth Zoom is a transition effect popular with vlogs and other quick cuts. It’s a zoom movement applied to 2 clips to join them smoothly.
Here’s an example of the smooth zoom transition effect created with this skateboarding woman stock video and this neighborhood skateboarding stock footage.
Step 1: Add adjustment layers
- Start with 2 clips in your timeline.
- Right-click on your Project panel, choose New > Adjustment Layer, and drag it to your timeline.
- Resize the adjustment layer so it overlaps both clips.
- Duplicate the adjustment layer to the track above it. Resize the bottom adjustment layer so that it begins with the second video clip and ends with the top adjustment layer.
Step 2: Keyframe it
- Add the Transform effect to the top adjustment layer and keyframe a zoom that scales from 100 to 300.
- Add motion blur by unchecking the option for use composition shutter angle and setting it to 180.
- If you play it back, it’ll look a bit strange, but hang in there. For now, hide the top adjustment layer.
Step 3: Replicate
- Open the Effects panel. Find the Replicate effect and add it to the bottom adjustment layer.
- In the Effect Controls panel, set the effect to 3.
Step 4: Mirror
- This next part is tricky. Don’t worry, you can do it. You’ll need to reflect the center image 4 times. Think of it as reflecting over the 4 lines that make up the grid below.
- Find and add the Mirror effect 4 times.
- These 4 images will appear in the Effect Controls panel.
Now, you need to do some technical tricks:
- For the first reflection: Set the Reflection Angle to 90 degrees and adjust the Y parameter until the line disappears between the middle and bottom rows of your grid.
- For the second reflection: Set the Reflection Angle to -90 degrees and adjust the Y parameter until the line between the top and middle rows disappears.
- For the third reflection: Set the Reflection Angle to 180 degrees and adjust the X parameter until the line between the left and center columns disappears.
- For the fourth reflection: Set the Reflection Angle to 360 degrees and adjust the X parameter until the line between the center and right column disappears.
Remember: You’re just reflecting over 1 line at a time. Don’t be intimidated. This is easier than it may seem. Your smooth zoom in Premiere Pro is almost done.
Your grid should not have harsh lines. When you’re happy, unhide your Scale adjustment layer and play it back. Make adjustments as needed.
We have some other tips for silky-smooth zoom transitions in Adobe Premiere Pro, too. There’s also some fun zoom plugins to consider.
3. Dolly zoom effect
In-camera, a dolly zoom effect is created by dollying the camera forward or backward and simultaneously zooming the lens in the opposite direction.
The result is a truly unsettling effect. The subject’s size stays the same, but the background recedes around them. It’s a great way to add an emotional hit to a scene. An iconic example is in the movie Jaws. It’s sometimes called a ‘Hitchcock zoom’, as Alfred Hitchcock invented it for Vertigo.
Creating this effect in-camera is complex. You need a dolly cam, several camera operators, and great directorial skills. Luckily, creating a mock dolly zoom in Adobe Premiere Pro is much easier. Plus, it looks pretty close to the real thing.
Below is an example where Motion Array used this stock video of a stoic man to create a dolly zoom effect.
Step 1: Select a clip
- The trick to this effect is selecting an appropriate clip to start with. The camera must physically move forward or backward.
- It could be a dolly or drone movement, but not an in-camera zoom. Remember, you’re mimicking dolly camera tracking with the video. You’ll then make the zoom part happen in Premiere Pro.
- This effect also works best when your clip has a clear subject.
Step 2: Create the zoom and finesse the effect
- This part is easy because you already know how to create a basic digital zoom in Premiere Pro — and that’s all you’re doing.
- Align your keyframes with the start and end of the dolly movement.
- It may take a few tries to get the scale right.
- Remember, the goal is to keep your subject the same size for the clip’s duration.
And that’s a wrap! Whether you need to add narrative impact to a short film or add flair to your YouTube channel, a well-placed zoom in Adobe Premiere Pro has you covered. Once you know how to zoom in Premiere Pro, it’s simple to customize the effect. Post-production just got a whole lot easier.

Are you new to Premiere Pro and want to become a fantastic editor? Why not try Motion Array’s free Premiere Pro basics course? It’s a set of 7 quick lessons that will leave you confident in Premiere Pro. Motion Array has plenty of other Premiere Pro tutorials for you, too. Get started today, and you’ll soon feel like a real pro.