


Video noise will be a problem for all editors — it’s frustrating but inevitable. Noise mostly occurs during recording. Typically, it’s a light-based issue, with too little light in the shot, the wrong lens, or too-high ISO, all causing a noisy video. There’s no better fix for grainy and noisy video footage than taking the time to shoot it right.
What if it’s too late for that, however? The footage is already shot, and you need to use it.Fortunately, noise reduction in Premiere Pro is pretty easy. In this detailed tutorial, you’ll learn some simple methods using Premiere Pro and After Effects, without any plugins needed. Motion Array also has some other great tips for improving bad footage in After Effects if you need more help.
Summary
What is noise reduction?
For video, noise reduction means fixing grainy areas in the shot. The electronic sensor creates the noise in the camera (CCD) and measures the light for each pixel in your image. How you set up your camera will change how the sensor records this information.
When you shoot in low light, the sensor might not have enough information to record the image with depth and detail. Since the sensor is recording light levels, darker areas of your shot are the most affected.
The best thing you can do to combat video noise is to add more light to your shot. And remember, it’s easier to grade your footage darker than to edit out noise. But if your video is already grainy, these noise-reduction methods will make it less noticeable. Motion Array has more great tips for filmmakers to help you, too.
3 simple steps to reduce noise and remove grain in Premiere Pro
The first thing you need to know about noise reduction in Premiere Pro is that there’s no one-size-fits-all option. It would be great if a drag-and-drop effect could automatically identify and reduce noise, and with newer AI features, the video editing world is getting close to doing so, too. But until then, each clip needs to be treated individually.
Step 1: Add the Median Effect
There are 2 staple effects to reduce grain in Premiere Pro: Median and Dust and Scratches. While you can use a plugin to achieve a similar result, you’re here to learn how to do so without plugins. So, here’s a simple way to reduce the video noise significantly:
- Add your footage to your Timeline.
- In the Effects panel, search for Median.
- Drag and drop it to your clip.
Step 2: Mask the Grainiest Parts
The next step to noise reduction in Premiere Pro is to ensure that you’re only adding the effect to the right parts of your clip. For this, you’ll use masks:
- Select the best-suited mask shape for your clip in the Effects Control panel.
- Using the Pen tool, move the Mask around the screen and resize it to cover the area.
- You can add extra points to your mask shape to make it fit.
- Change the Feather setting to +100 so the effect won’t have a visible edge.
- Repeat with other masks until you’ve covered all grainy areas of your shot.
Step 3: Adjust the Radius Settings
Now that you’ve covered all the grainy areas with masks, you must adjust the effect settings to reduce the noise. The Median effect doesn’t remove the graininess. It just blurs it. You’ll need to experiment with the Radius settings until you’re happy with how the clip looks.
Introducing Lumetri Color panel
Depending on your Adobe Premiere Pro version, the newer Lumetri Color panel can do much of this in one place, too. Here’s what to do if you have Lumetri available:
- Open Lumetri Color panel:
- Select your clip in the Timeline.
- Go to Window > Lumetri Color if the panel is not already visible.
- Basic correction:
- While the noise reduction tools are mainly in the Color Wheels and Match section, it’s best to start with basic corrections.
- Adjust Exposure, Contrast, Highlights/Shadows, Whites, and Blacks as needed.
- Color Wheels and Match:
- Now, scroll to the Color Wheels and Match section.
- You’ll find Shadows, Midtones, and Highlights color wheels and sliders here.
- Look for the Denoise and Blur sliders.
- Fine-tuning: After applying the initial denoise and blur adjustments, you should fine-tune other settings. For more targeted corrections, you can use Curves and HSL secondary.
You’ve now reduced grain in Premiere Pro, so your video’s graininess should look much better!
If you’d like even more control, consider using the After Effects approach, which will be explained in the next section.
Use Dynamic Linking to Reduce Noise in After Effects
If you have After Effects, there’s another (and better) way you can reduce grain in your videos. You may wonder, “Why don’t I just buy a plugin rather than paying for After Effects?” Well, there are several reasons why After Effects is better:
- If you have a subscription to Adobe Suite, you already have access to After Effects, so it won’t cost you anything.
- If you buy a plugin for noise removal, that’s likely all it will do. After Effects gives you endless possibilities in your video editing toolkit.
- Plugins are created by third parties, not by Adobe. You could spend money on a plugin that, within a year, will no longer work. You may even have to pay for future updates. Additionally, the person who created it may stop updating, or it may stop working altogether.
If you have access to After Effects, try this super simple noise removal method instead.
Step 1: Create a dynamically linked clip
The first step is to move your clip into After Effects. Premiere Pro lets you do this easily:
- Select the clip you want to move to After Effects in your Premiere Pro timeline.
- Right-click the clip and Replace With After Effects Composition.
- After Effects will open. You’ll have the option to save your New Project.
- Save the After Effects project alongside your Premiere Pro one to keep them together.
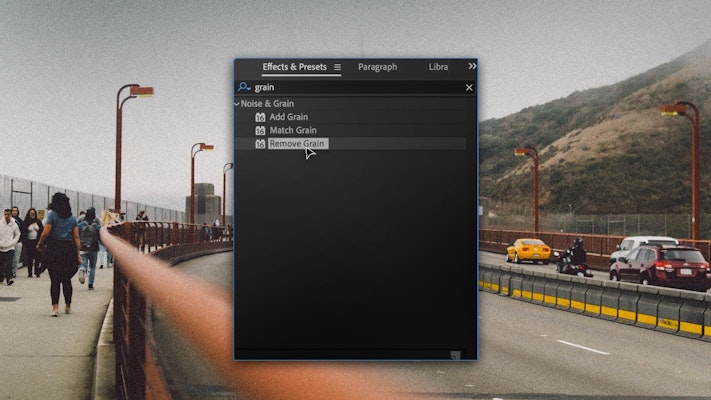
Step 2: Add the Remove Grain effect
While you’re adding effects in After Effects, you don’t need to do anything in Premiere Pro. The Dynamic Link will automatically update the clip in Premiere with the effects you added in After Effects:
- First, check that the Effects panel is viewable by going to the Window menu. Make sure to check the Effects and Presets options.
- In the Effects Control panel, search for Remove Grain.
- Drag and drop the effect to your clip.
- Newer versions of After Effects offer further control through the Denoiser option.
Step 3: Setting your preview box
After Effects gives you a handy preview box where you can see what the new effects will look like. You can move the preview window around your screen to view different areas.
- Click on the clip in the timeline and go to the Effects Control panel.
- Drop down the Preview Region settings.
- Adjust the width and height of your Preview Window, and use the center control to move the box around the screen.
Pro tip: Place the preview window on half of the noisiest portion of your clip so you can compare the settings.
Step 4: Adjust the Noise Reduction settings
After Effects will apply the default settings as standard, which may be the right amount of grain removal for your clip. You can also fine-tune the effect to increase the grain removal:
- In the Effects Control panel, drop down the Noise Reduction settings menu.
- Adjust the Noise Reduction setting until you’re happy with the look.
- Move the Preview Window around the screen. Make sure the effect isn’t blurring too much of the focus of your shot.
- If you want to check what the whole shot looks like, go to the Viewing Mode at the top of the Effects Control panel and choose Final Output.
- Save your project, and return to Premiere Pro to continue your editing.
Advanced Tip: Render and Replace
Dynamic linking from After Effects can use some processing power, which can cause a playback lag. A quick way to combat this is to use the Render and Replace function in Premiere Pro.
- In Premiere Pro, right-click on the Dynamic Linked Composition in the Timeline.
- Select Render and Replace.
Premiere Pro will render the effect and clip. Essentially, this will flatten them into one clip so that it doesn’t need to process the clip information before processing the applied effects.
Advanced tip: Enter AI to assist
Are you a video editor on the cutting edge? In 2023, Adobe announced new AI-powered tools for After Effects and Premiere Pro. Many of these will help to fine-tune and improve existing filters, including denoising. Noise reduction in Premiere Pro is now easier than ever. AI also assists in making smarter choices for these filters. So, if you’re using the most modern version, look out for them.
Video noise can be frustrating for everyone in the production process. Don’t be too hard on your camera operators. It’s a stressful job, and camera screens often don’t let you see the full extent of noise in a shot. Instead, consider it a challenge now that you have the editing skills to reduce video noise in Premiere Pro and After Effects.
FAQ: Noise reduction in Premiere Pro video editing
What is noise in video editing?
Noise in video editing is the unwanted visual artifacts or graininess in video. Low-light conditions typically cause it. Noise can detract from the quality and clarity of your video. Luckily, you can remove this grain in Premiere Pro and other video editing software.
What causes noise in videos?
Low light conditions, high ISO settings, and compression artifacts are the typical causes of video noise. The first two are an aspect of the original footage. Compression artifacts occur when the video is over-compressed after editing.
How can I reduce noise in my video footage?
Many video editing software programs offer built-in noise reduction tools. Noise reduction in Premiere Pro is surprisingly useful. However, the best way to reduce noise is by shooting in good lighting and with the correct ISO settings.
Why does noise reduction make my video blurry?
Noise reduction in Premiere Pro smooths out the grainy areas of your video, but it can sometimes lead to a loss of detail. Balancing the strength of the noise reduction effect is key to maintaining high video quality. So, please don’t overdo it!
Is it possible to completely remove noise from my video?
It’s challenging to remove noise completely, especially in footage shot under less-than-ideal conditions. You can, however, reduce it to a point where it isn’t noticeable. The key is using the right shooting techniques and post-production tools.


