


As with any complex software, Final Cut Pro will sometimes give you problems. Some errors result from corruption or issues with the software or device, while others will come from the project setup or user faults. Fortunately, troubleshooting Final Cut Pro challenges is pretty simple. Today, Motion Array has compiled a list of the 8 most common Final Cut Pro fails — and fixes to help you.
Summary
Part 1: Learn the basic software fixes
Before you try advanced troubleshooting for Final Cut Pro, there are a few basic solutions that everyone should try. In fact, these are useful for any video editing software, not just Final Cut Pro.
Restart the program
While this is obvious, you’d be surprised how often a simple restart works. You can close and reopen the program or fully reboot your computer. This does several things. For one, it clears the cache, which can remove corrupted or problematic files. It also allows the program or device to cycle its power, remove redundant files, and generally reset. This is an especially good fix for loading errors or when Final Cut Pro isn’t responding.
Update the software
Another simple step in troubleshooting Final Cut Pro is to check for updates. Old software can cause errors or conflicts with newer elements, especially plugins. Regularly updating your software also helps keep your device more secure and closes loopholes criminals can use. Head to the Apple App Store to check for Final Cut Pro updates.
Try a reinstall
Software developers do their best to keep their program updates stable, however, unexpected issues can occur. If you’re experiencing crashes, especially after an update, try uninstalling and reinstalling Final Cut Pro. This gives you a chance to try the program out fresh. It’s often enough to fix any minor corruption or problems.
These 3 basic troubleshooting steps are ones everyone should know. Now we’ll look at troubleshooting Final Cut Pro in more depth.
Part 2: 8 must-know Final Cut Pro fixes for editors
1. Expanded audio fix
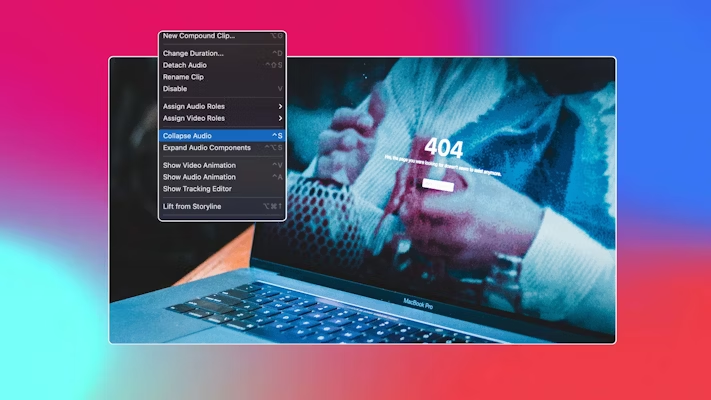
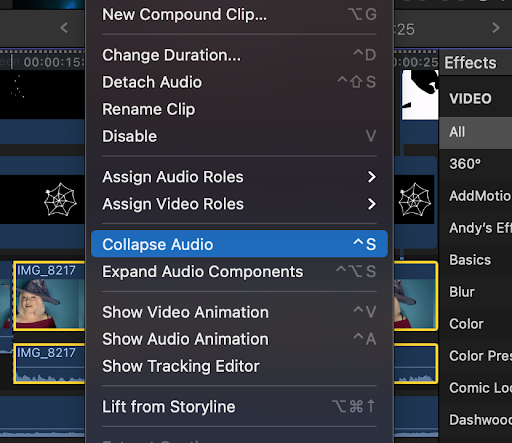
Expanded audio isn’t, strictly speaking, an error. It’s part of how Final Cut Pro works. If you’re a new editor, it will still be scary to see your video and audio expanded — especially if you don’t know how to undo it!
Final Cut Pro lets you expand your audio to create L and J cuts. In most cases, you must deliberately select the Expand Audio option, however, Final Cut Pro will occasionally expand a clip’s audio automatically. This often happens when you load a clip over another clip in the primary timeline.
Whether expanded or not, your audio will work the same and is still attached to its original video. If you want to collapse your audio again, you can right-click the clip, choose Collapse Audio, or hit Cmd+S on your keyboard.
2. Missing media fix
The missing-media ‘red screen of death’ is a frustrating one, no matter how skilled you are. The good (and bad) news is that this is typically due to human error. Luckily, you can fix it easily.
When you have missing media clip errors, Final Cut Pro can’t find the clips you previously imported. If you imported the clips correctly, the media will be copied to the Final Cut Pro project bundle and connect every time you open the project.
If you import your clips by dragging and dropping them into the timeline, the media won’t copy them to the Final Cut Pro bundle. Instead, media will be pulled from where it was saved on the device. If you move or delete the clip or disconnect the hard drive containing the footage, Final Cut Pro will show it as missing.
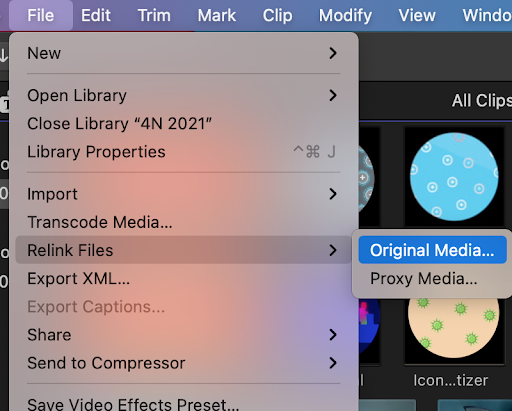
It’s natural to panic at this point, especially if you’re deep into editing your project and suddenly see a timeline with nothing but empty clips. Don’t panic, as you can relink the clips. First, select them in the Media Browser. Now choose File > Relink Media. You can navigate to where your clips are saved and reconnect them. You’ll still need to have a copy of your original media to get this fix to work, though. This is why learning to set up and import clips properly is so vital.
3. Importing footage fix
Occasionally, a clip might be shown as missing media. You’ll see a camera-shaped icon in the corner of the thumbnail. This error has similarities with the one above, but usually happens because a camera or SD card was removed before the footage was fully imported.
When you import footage directly from a device, the clip thumbnails appear before the import is finished. You must check that the import is complete before disconnecting your device. To see any import or export progress, hit Cmd+9 on your keyboard.
If interrupting the import has ‘lost’ your media files, follow these steps:
- Reconnect your camera or SD card.
- Open your Final Cut Pro Project.
- Select the missing media clips in the Project browser.
- Go to File > Import > Reimport from Camera Archive > Continue.
- Wait for the media to complete the import before disconnecting.

4. Big or full library fix
Footage can take up a lot of room on a hard drive. Due to this space-hungry challenge, the ‘library is full’ error is common for editors. This can cause issues where it seems Final Cut Pro isn’t responding. Fortunately, there are a couple of ways to fix it — essentially, you need to free up space so you can get back to work. Doing so will also speed up your Final Cut Pro workflow.
Check where the library is saved
A common mistake from newer editors is saving the library to your Mac’s internal storage. Macs are low on native storage space, and you should use an external drive for your work for the expanded space. First check your library location — the error message will tell you where it’s saved. Now go to the Inspector and click on Information. Here you’ll see where each element is saved. Click Modify and choose new locations with more space for your work.
Clear up space
Another option if you’re facing a full library is to clear space on your drives. Move or delete any files you don’t need from the library, but be sure not to delete any assets that aren’t in the Final Cut Pro bundle.
Clearing cache files from the library can also help, just make sure you relocate your library before removing anything. Your project may include clips you don’t need, so also check the project from within Final Cut Pro. If you spot any extra or duplicated content, you can clean it up.
Troubleshooting Final Cut Pro storage issues will typically involve getting rid of old files and giving the program more disk space to work with.
5. Final Cut Pro library corruption fix
If your library refuses to open at all or crashes any time you try to work, it could be corrupted. There are several causes for this and, as a result, there are several fixes to try. Here’s how to troubleshoot Final Cut Pro corruption issues.
Issue: Not opening
If the library isn’t opening at all, the saved location may be corrupted. First, try to move the entire library to a new location. You’ll want to choose a separate drive for the best results. If the library still doesn’t open, you can be certain the corruption is within the library itself.
- Go to the Final Cut Pro bundle and right-click Show Package Contents.
- Select the Settings.Plist and CurrentVersion.flexolibrary folders and delete them.

Issue: Opening, but crashing
If your library opens, but immediately crashes when you try to edit, something in the project is likely corrupted. The cause is often one single clip — finding it can be a challenge, however! First, copy the library to a new location. While this may seem odd, it can sometimes reveal a corrupt file.
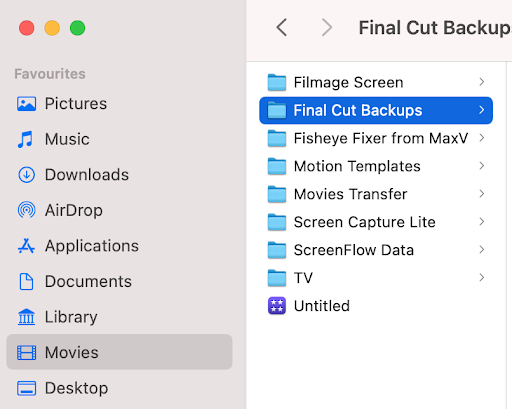
If all else fails, Final Cut Pro saves backups of your project. Reloading a backup will restore your timeline. It’s pretty easy to do, too. Locate the backup in your Library Media and select the most recent autosave. Double-click and Final Cut Pro will walk you through the rest of the restoration.
6. Zoomed-in viewer fix
The zoomed-in Media Viewer issue is another problem beginners often face, but again, it isn’t a true error. You’ve zoomed in (or out) of your timeline, but may not realize you’ve done so if you’ve never changed media views before. It may seem as if Final Cut Pro isn’t responding, but really, you’re just not seeing it on the shrunken timeline.
Final Cut Pro allows you to zoom in on your footage as a working tool. It lets you see specific areas better and may make certain editing techniques easier. At the top of the Media Viewer is a dropdown menu showing your percentage of zoom. Click the icon and choose a view to match the size of your viewer for your editing needs.
On the right-hand side of the Media Viewer, 2 boxes will appear when you’re zoomed in on a clip. The whole box represents the entire clip and the red box shows the area you’re viewing. While zoomed in, drag the red box inside the other to move around.
Remember that the timeline zoom isn’t a zoom effect. It’s just an easy way to see fine details in your project.

7. Undo a compound clip
Compound clips let you do a lot of things, such as organize your timeline, add effects, or resize a clip for keyframing. However, many beginners are scared to use them. With no clear way to undo the move, you might be worried that you can’t roll back changes.
If you accidentally create a compound clip, you can undo it immediately by pressing Cmd+Z. If you aren’t sure when the compound clip was applied, there are 2 ways to undo it. You’ll troubleshoot this Final Cut Pro issue below.
Paste it back in
Double-click on the compound clip to open it and copy everything in the timeline. Click on the Timeline back arrow to return to the main sequence and re-paste the clips. You can then delete the compound clip. This can be a smart move as the compound clip will still exist in the Project Browser, with any edits unchanged.
Use a shortcut
Another simpler option is to use a shortcut. Select the compound clip and hit Cmd+Shift+G. Your original editing will now overwrite the compound clip, removing it from the Media Browser completely.
8. Frozen drop zones fix
If you use Final Cut Pro templates, you’ll likely use drop zones to add footage. Sometimes, you might encounter an apparently frozen frame at the end of the sequence.
Don’t worry, this isn’t an error — it’s Final Cut Pro trying to help you. The video pauses or freezes on the last frame because your clip isn’t long enough for the template. Rather than inserting black frames, Final Cut Pro freezes a frame for the rest of the sequence. There are a couple of ways to get around this:
- Choose a new, longer clip.
- Shorten the template until the clip fits.
- Create a compound clip of the footage you want to use. You can slow it down or duplicate it.
- When using the Media Drop Zone, choose this compound clip from the Media Browser, not your original footage.
Freeze frames can be used to create interesting effects, too, as seen in this bouncing freeze frame tutorial.
Now you know more about common issues in Final Cut Pro and some easy ways to fix them. With troubleshooting Final Cut Pro errors under your belt, Motion Array hopes you have a much smoother time with your editing. If you’re still experiencing challenges in Final Cut Pro, this tutorial has some crash fixes that could help, too.


